Table of Contents
Whole-House Power Monitoring
Introduction
I monitor the power consumption of the entire house in real-time and keep a permanent record to detect trends.
Hardware
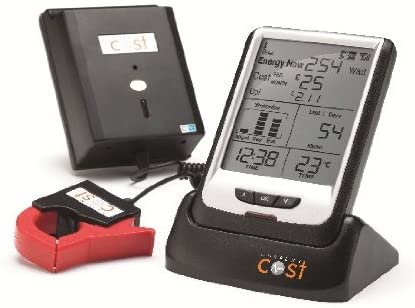
I use a device created by CurrentCost featuring a “clip-on” CT sensor which can detect the amount of power flowing through a mains voltage AC cable. This device is powered by battery and is installed in the electricity meter cupboard and the data is transmitted on 433MHz. The CurrentCost includes a base station which picks up the signal wirelessly and shows some basic information about your power consumption.
The exact model of CurrentCost I use appears to be discontinued but this model looks very similar: Amazon Link - CurrentCost now appears to refer to this model as “The Classic”. Searching on ebay for “CurrentCost” yields multiple results which also look very similar to our model and the prices seem to range from anywhere between £15 and £40.
In order to capture the data for long-term storage and analysis, I have used an SDR (Software Defined Radio) USB dongle tuned into 433MHz which can capture the signals wirelessly using a software package called rtl_433. I use the Nooelec NESDR SMArt v4 SDR which is generally around £30 on Amazon. Many cheaper SDR dongles are available and should work fine; generally anything which uses the RTL2832U chip is compatible - some of which can be bought for around £12.
Finally a PC or Raspberry Pi is required to plug your SDR into; this needs to be left running continuously and ideally it should be running Linux.
The Setup
Start by setting up your CurrentCost device, there should be instructions on how to do this in the box. There are also instructions on the CurrentCost website. The base station for your CurrentCost should now be displaying the number of watts your house is currently consuming in real-time which confirms your setup is working correctly.
Next, you need a device running Linux to connect your SDR dongle to. I used to use a Raspberry Pi 3 running Raspbian Lite for this a few years ago but now use my home server running Ubuntu Server in a virtual machine. For low power consumption, I recommend a Raspberry Pi for this task and this page on The Raspberry Pi website documents how to install the operating system.
Installing the Software
The following instructions assume you have a debian-based Linux distribution installed (Raspberry Pi OS, Ubuntu Server, etc):
Start by opening a terminal. On the Raspberry Pi OS, this is generally pinned to the top left menu bar by default. See this page on raspberrypi.org for more help if needed. On server distributions, you generally only have access to a terminal and no GUI so there is nothing to click. Log in to the terminal if you are prompted to do so.
First, update the package manager with this command:
sudo apt-get update
This allows your device to find new software which is available to be installed. Next, install the rtl-sdr package like so:
sudo apt-get install rtl-sdr
Linux assumes that your SDR dongle is intended to be used for watching TV and therefore tries to enable some TV/Radio functionality which interferes with some functionality. To prevent this behaviour, disable the default Linux driver by blacklisting it with this command:
echo 'blacklist dvb_usb_rtl28xxu' | sudo tee – append /etc/modprobe.d/blacklist-dvb_usb_rtl28xxu.conf
Alternatively, you can open the file at /etc/modprobe.d/blacklist.conf and add the line “blacklist dvb_usb_rtl28xxu” on a new empty line.
Now install rtl_433; on new debian-based distributions it should be as simple as this command:
sudo apt-get install rtl-433
However, on some distributions you may see this error:
E: Unable to locate package rtl-433
If this is the case, you will need to compile rtl_433 yourself. Detailed instructions on how to do this are avilable on the rtl_433 GitHub page but the Debian-based instructions are below (taken from the GitHub page):
Run the following commands only if you got the error “Unable to locate package rtl-433”:
sudo apt-get install libtool libusb-1.0-0-dev librtlsdr-dev rtl-sdr build-essential cmake pkg-config
git clone https://github.com/merbanan/rtl_433.git
cd rtl_433/
mkdir build
cd build
cmake ..
make
make install
It is important to reboot the system fully after installing the SDR software so you should do that now.
Using the Software
After rebooting, you should be able to run this command (ensure your SDR is connected first):
rtl_433
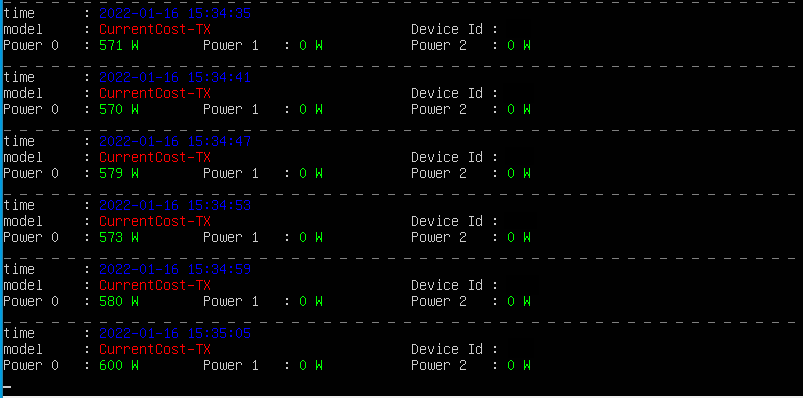
Upon running this command, rtl_433 should start listening for wireless signals and will attempt to decode them for you. You should hopefully see something like this (you may need to wait for a while before any signals are received):
rtl_433 can pick up signals from many devices which transmit on 433MHz so in some situations you may see lots of information being displayed from weather stations to tyre pressures. Hopefully you should see “CurrentCost” somewhere in the list which matches the number of watts which your CurrentCost base station states.
Each CurrentCost should have a different “Device Id” value which uniquely identifies the transmitter. (Note: I have hidden the ID on my screenshot above). You need to determine which ID belongs to your transmitter by seeing which values match up to your CurrentCost base station display. Make a note of your CurrentCost device ID once you have found it, you will need it later.
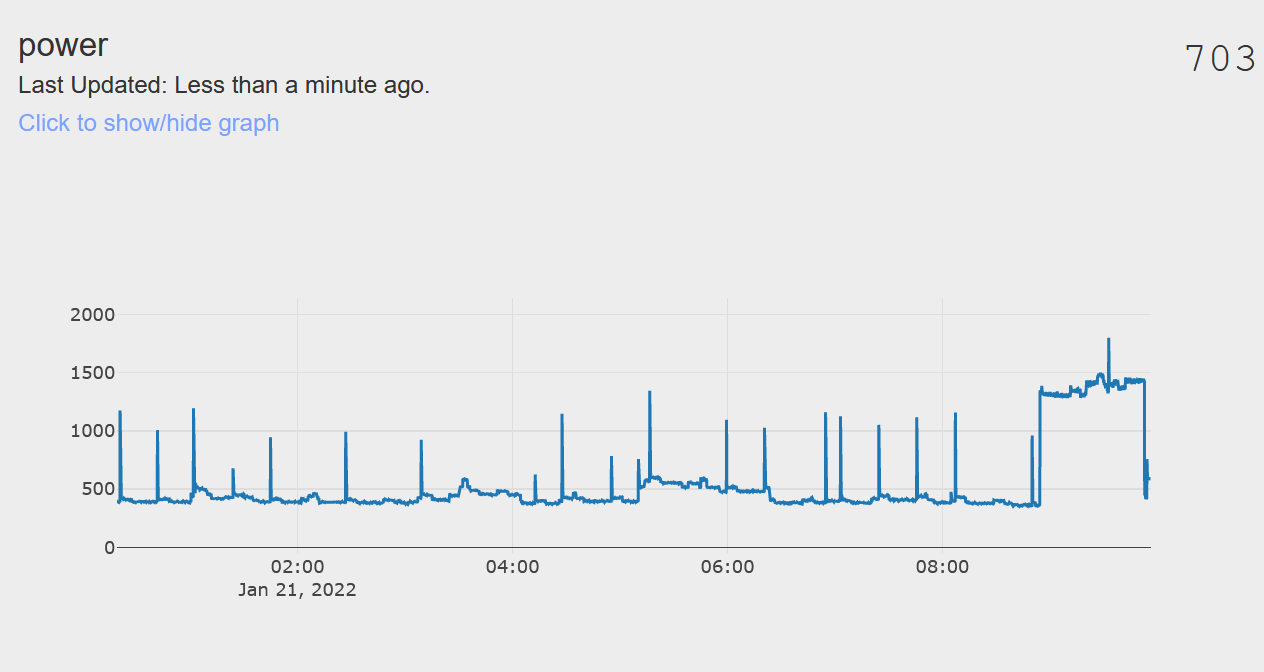
I wrote a Python script which allows CurrentCost energy readings to be graphed on IoTPlotter (which is a service I created) – By sending your data to IoTPlotter, you should get a graph of your power consumption similiar to this:
IoTPlotter graphs are interactive which means you can zoom in on areas of interest such as your nighttime consumption.
Download the Python script using this command:
wget "https://gist.githubusercontent.com/JosephHewitt/e49f5c1bdcfb27ddfb92cc7f715cb33d/raw/8e1edd6fc981880e2fb8af3d31ab680856e4d6c3/ccparse.py" -O ccparse.py
Run this command to ensure your user has permission to run the script:
chmod +x ccparse.py
Configuring the Software
Before you can configure the Python script, you will need an IoTPlotter account. You can sign up at https://iotplotter.com/register.html
After logging in with your new IoTPlotter account, click the “Create New Feed” button. You should then be on a page called “Untitled Feed” which states “This feed has no data”.
In the centre of the page, there should be a line which says “Feed ID” and an 18 digit number, you will need this number later so paste it somewhere convenient.
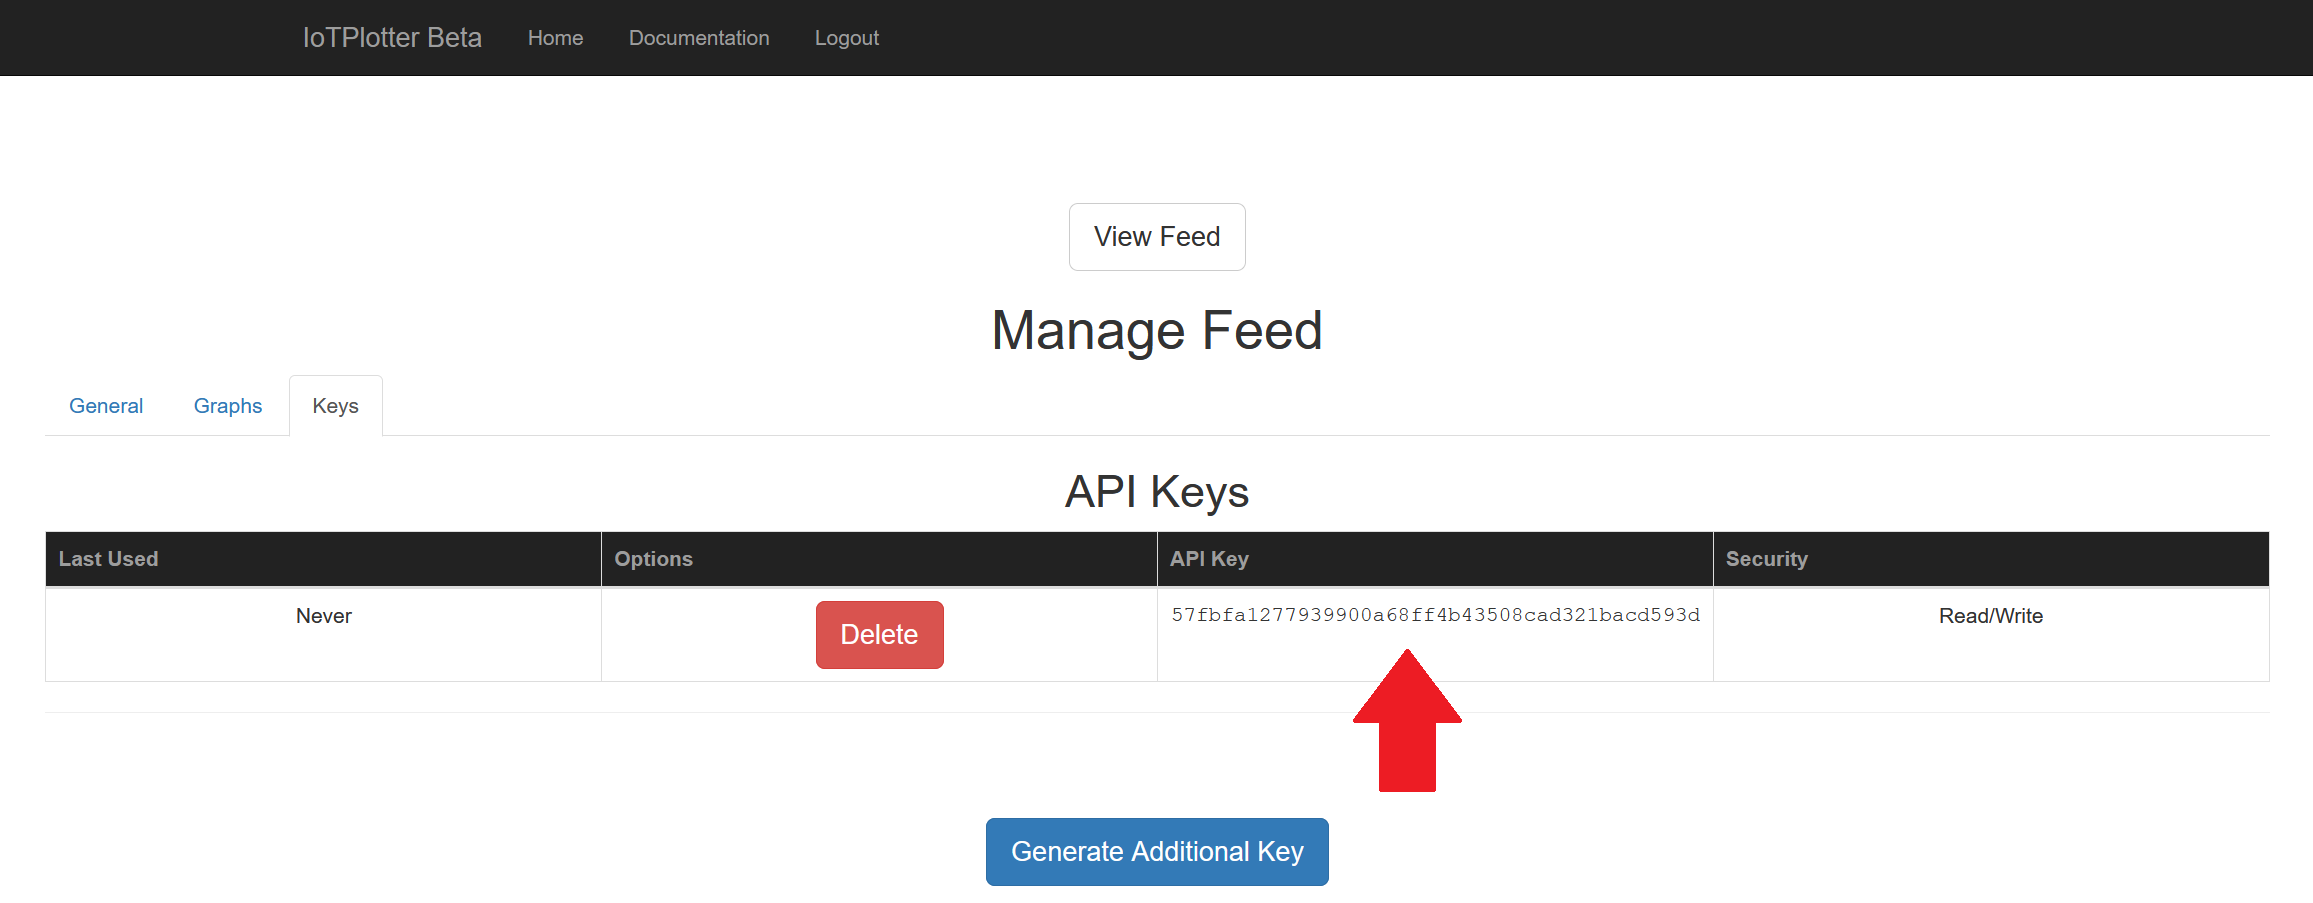
Click the button labelled “Manage Feed” and then click the tab labelled “Keys”. You also need to copy the 42 character API key listed on this page. See the image below for an example:
You now have enough information to configure the Python script which you downloaded earlier (ccparse.py).
The Python script has 3 lines which need editing with your information to make it work. You can edit the file with this command:
nano ccparse.py
The 11th line has a variable named cc_id which needs updating with the ID of your CurrentCost. If you discovered that your CurrentCost has a “device id” of 123, you would change the line so it looks like this:
cc_id = "123"
Everything after the # symbol is a comment and can be left unedited.
Line 12 has a variable called api_key which you should paste from IoTPlotter like so:
api_key = "57fbfa1277939900a68ff4b43508cad321bacd593d"
Be sure to copy the key so it matches exactly what IoTPlotter states; the key must be pasted between the quotemarks.
Finally, paste in your IoTPlotter feed ID (the 18 digit number) in the same manner so it should look something like this all together:
cc_id = "123"
api_key = "57fbfa1277939900a68ff4b43508cad321bacd593d"
feed_id = "175984679654520118"
To save the file, press CTRL+x. You will be asked “Save modified buffer?”, press the y key to confirm and then press enter.
Finally, to run the script and start sending your power consumption data to IoTPlotter, run this command:
rtl_433 -F json | python3 ccparse.py
After around 1 minute, your power consumption data and a graph should be visible if you refresh your IoTPlotter feed.


